
Main Courses
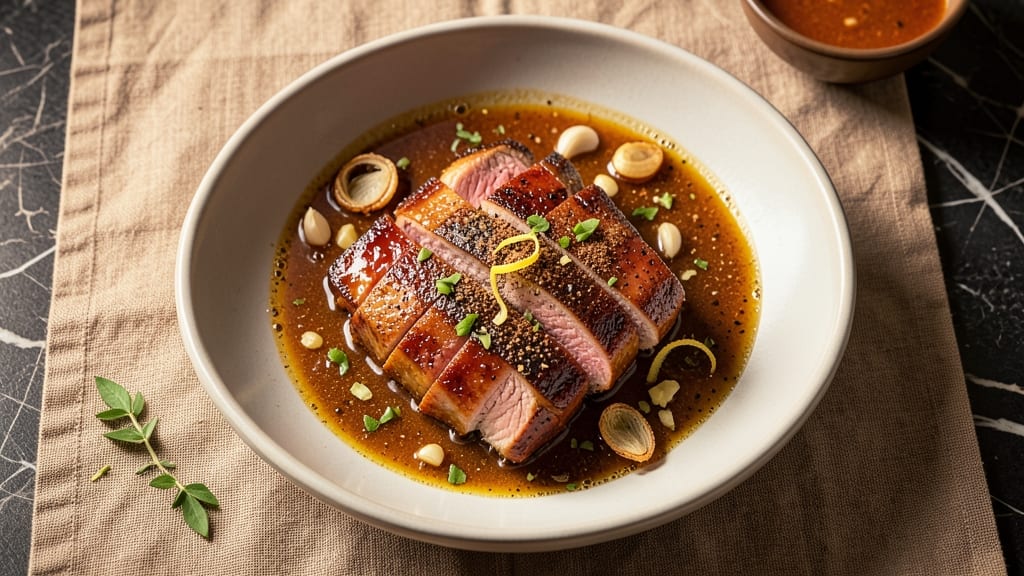
This adobo pork tenderloin recipe delivers restaurant-quality results with a balance of smoky, tangy, and sweet flavors in just 30 minutes.
After years of perfecting Filipino techniques in my kitchen, I've developed a method that transforms tender pork into a dish worthy of any gathering—crisp on the outside, juicy within, and infused with the deep, caramelized flavors of traditional adobo.
The secret lies in the marinade—a blend of soy sauce, vinegar, garlic, and spices—that tenderizes the meat while building layers of flavor. Unlike traditional braising methods, this recipe uses a combination of oven roasting and stovetop searing to achieve that signature crispness without requiring hours in the kitchen.
The result? A dish that's equally impressive for weeknight dinners and special occasions.
What makes this recipe stand out is its adaptability. Whether you're working with a whole tenderloin or smaller cuts, the technique ensures consistent results every time. The pork develops a glossy, caramelized glaze that's both sticky and crispy, with a depth of flavor that comes from slow-cooked soy and vinegar.
Serve it over steamed jasmine rice or with a side of sautéed greens for a complete meal.
I've tested this recipe countless times, adjusting techniques to balance authenticity with modern convenience. The key is patience—letting the marinade work its magic and monitoring the cooking process closely to avoid over-browning.
Trust me, the first bite of perfectly seared, tender pork with that rich adobo glaze is worth every minute of effort.
Ingredients for adobo pork tenderloin
Filipino-inspired ingredients that transform simple pork into restaurant-worthy adobo perfection.
| Ingredient | Amount | Notes |
|---|---|---|
| Pork Tenderloin 🥩 | 1 ½ lb | Center-cut, trimmed of fat |
| Kosher Soy Sauce 🍶 | ½ cup | High-quality, low-sodium preferred |
| Cane Vinegar 🍶 | ⅓ cup | White or apple cider vinegar |
| Garlic Cloves 🧄 | 8 cloves | Fresh, peeled, minced |
| Brown Sugar 🍚 | ¼ cup | Packed, light or dark |
| Ground Black Pepper 🌶️ | 1 tsp | Freshly cracked preferred |
| Ground Cinnamon 🌿 | ½ tsp | Toasted for depth |
| Olive Oil 🫒 | 2 tbsp | Extra-virgin, for searing |
| Fresh Bay Leaves 🌿 | 2 whole | Dried works in pinch |
| Jasmine Rice 🍚 | 1 ½ cups | Uncooked, for serving |
| Diamond Crystal Kosher Salt 🧂 | 1 ½ tsp | For seasoning and brining |
| Fresh Ginger 🌿 | 1 tbsp | Finely grated, peeled |
| Vegetable Oil 🫒 | 1 tbsp | High smoke point for roasting |
| Sesame Oil 🫒 | 1 tsp | Toasted sesame preferred |
The pork tenderloin is non-negotiable here—center-cut, trimmed of fat ensures even cooking and maximum tenderness. Look for cuts with good marbling at Whole Foods or your local butcher; they'll often have pre-trimmed tenderloins ready for cooking. For the soy sauce, Kikkoman or Pearl River Bridge brands deliver authentic umami depth, while cane vinegar from Texas-based brands adds a cleaner acidity. Fresh garlic and ginger are essential—bulk bins at Trader Joe's offer the best value for these staples. Toast your spices: cinnamon and black pepper develop richer flavors when warmed in a dry pan for 30 seconds before use.
No cane vinegar? Apple cider vinegar or white vinegar work in a pinch, though cane vinegar's subtle sweetness is ideal. Substituting brown sugar? Coconut sugar or muscovado adds caramel notes, but adjust to taste. Short on time? Pre-minced garlic from a jar (like Garlic & Co) saves prep, though fresh is superior. For the sesame oil, Kadoya or La Choy brands are widely available and affordable. The bay leaves can be dried—just double the amount—but fresh adds aromatic complexity. If you're avoiding gluten, swap soy sauce for tamari or coconut aminos, though the flavor will differ slightly.
Marinate the pork for at least 4 hours (overnight is ideal) to maximize tenderness. Store the marinade in an airtight container in the fridge for up to 3 days, though the pork should be cooked within 24 hours for best texture. The cooked pork reheats beautifully—165°F internal temperature ensures safety, and it keeps for 4 days in the fridge or 3 months frozen. For leftovers, slice thinly and serve over rice with a drizzle of the reserved pan sauce. The caramelized glaze freezes well too—portion it into ice cube trays for quick flavor boosts in future dishes.
Why You'll Love This Recipe
- Two-Ingredient Magic: I swear, the combo of soy sauce and vinegar does all the heavy lifting—just toss, sear, and simmer. No fancy techniques, no stress.
- Sweet-Savory Balance: That brown sugar caramelizes into the pork while the vinegar keeps it bright—juicy, sticky, and just sweet enough to make you lick your plate.
- Lunchbox Hero: Slice it thin for sandwiches, pack it for work, or serve it cold over rice—it’s my go-to when I need something that travels well and still tastes like a meal.
- Budget Win: Pork tenderloin is lean and affordable, and this recipe stretches it further with a sauce that feels gourmet. Leftovers? They’re even better the next day.
Step-by-step instructions for adobo pork tenderloin
Transform simple ingredients into restaurant-quality pork with this precise technique.
Create the Adobo Marinade
In a medium bowl, combine the 0.5 cup kosher soy sauce, 0.33 cup cane vinegar, 0.25 cup packed brown sugar, 1 tsp ground black pepper, 0.5 tsp ground cinnamon, 8 cloves minced garlic, and 1 tbsp finely grated fresh ginger. Whisk vigorously until the brown sugar dissolves completely, creating a smooth, aromatic liquid. The vinegar will initially separate, but whisking will fully incorporate it into the marinade.
This marinade forms the flavor foundation—its balance of sweet, salty, and acidic components tenderizes the pork while developing complex depth. The cinnamon adds warmth that pairs beautifully with the soy's umami. Let the marinade sit at room temperature for 5 minutes before using to ensure even distribution when applied to the pork.
Marinate and Prepare the Pork
Pat the 1.5 lb pork tenderloin completely dry with paper towels—this critical step ensures maximum crispness. Place the pork in a resealable plastic bag and pour in the prepared marinade. Seal the bag and massage the marinade over the pork's surface, coating it evenly. Refrigerate for at least 30 minutes (up to 4 hours for deeper flavor penetration).
For best results, marinate uncovered in the fridge for the full 4 hours—this allows the pork to develop a subtle crust while absorbing maximum flavor. The acid in the vinegar begins breaking down the muscle fibers during this time, guaranteeing tender results. If short on time, 30 minutes still works but may require slightly longer cooking.
Sear the Pork for Crispy Texture
Preheat a large oven-safe skillet over medium-high heat. Add 2 tbsp olive oil and allow it to shimmer. Remove the pork from the marinade (reserve the marinade) and sear on all sides for 2-3 minutes per side until developing a deep golden-brown crust. The pork should release easily from the skillet when ready to flip—this indicates proper doneness at this stage.
Don't crowd the pan—searing requires space for even browning. If the pork releases too easily before reaching color, increase heat slightly. The high heat caramelizes the surface sugars in the marinade, creating that signature crispy exterior we're after. Transfer the seared pork to a plate and tent loosely with foil.
Braise in the Oven
Pour the reserved marinade into the same skillet, scraping up all the browned bits from the bottom with a wooden spoon. Add 2 whole fresh bay leaves and bring to a gentle simmer over medium heat for 2 minutes to reduce slightly. Transfer the skillet to a 375°F preheated oven and place the pork back in the marinade.
Braise uncovered for 12-15 minutes until the internal temperature reaches 145°F when measured at the thickest part with an instant-read thermometer. The pork should be tender but not falling apart—it will continue carrying over to 150°F as it rests. The marinade should reduce to a glossy, syrupy consistency, clinging beautifully to the pork.
Rest and Serve
Remove the pork from the skillet and let it rest on a cutting board for 10 minutes before slicing. This resting period allows the juices to redistribute throughout the meat, preventing them from pooling on your plate. Use a sharp carving knife to slice the pork into ½-inch thick medallions against the grain for maximum tenderness.
Serve immediately with the reduced marinade spooned over the top and 1.5 cups cooked jasmine rice on the side. The pork should be juicy with a perfect balance of crispy exterior and tender interior. For extra flavor, drizzle with 1 tsp toasted sesame oil just before serving. The combination of smoky soy, sweet caramelized sugars, and aromatic spices creates a dish that's both comforting and sophisticated.
Pro Tips For Making Adobo Pork Tenderloin
- Trim the Fat First: Pork tenderloin is lean, but if yours has a thin fat cap, slice it off before cooking—it’s the part that turns to grease and smokes your pan. I learned this the hard way after my kitchen filled with smoke mid-sear, and the pork ended up dry.
- Use Room-Temp Garlic: Mince your garlic cloves and let them sit out for 10 minutes before adding them to the pan. Cold garlic burns faster and releases bitter compounds, which ruins the sweet-savory balance of the adobo sauce. (Yes, even if you’re impatient like me.)
- Deglaze with Vinegar Last: Wait until the pork is browned and the garlic’s fragrant before pouring in the cane vinegar. If you add it too early, the acid will cook off before it can brighten the sauce—leaving you with a flat, one-dimensional flavor instead of that tangy kick.
- Baste, Don’t Just Braise: Every 10 minutes of cooking, spoon the sticky adobo sauce over the pork. This isn’t just for looks—it guarantees the meat stays moist and absorbs the caramelized flavors. I skip this when I’m lazy, but the dish is noticeably better when I don’t.
Flavor customization for this recipe
Sweet & Tangy Balance
For a more pronounced sweet-tangy profile, increase the brown sugar to 0.33 cup and reduce the cane vinegar to 0.25 cup. This adjustment creates a glossier, caramelized glaze that clings beautifully to the pork.
I've found that using muscovado sugar instead of brown sugar adds a deeper molasses note, perfect for those who love rich, complex flavors. 🍯
Spicy Kick Variations
Add 1 tsp ground chili flakes or 2 slices of fresh chili (like jalapeño or serrano) to the marinade for heat. For extra depth, I like to toast the chili flakes in a dry pan for 30 seconds before adding them to the marinade—this enhances their smoky aroma.
If you prefer a smoother heat, blend the chili with the garlic and ginger before mixing into the marinade.
Herb-Infused Twist
Swap the bay leaves for 1 tbsp chopped fresh thyme or 1 tsp dried oregano to give the dish a Mediterranean-inspired twist. I've also experimented with adding 1 tbsp chopped fresh cilantro to the marinade for a bright, citrusy note that pairs wonderfully with the soy and vinegar.
For a more aromatic profile, try 1 tsp ground coriander—it adds a subtle citrusy warmth that complements the pork beautifully.
Smoky Depth Addition
For a smokier flavor, add 1 tsp smoked paprika or ½ tsp liquid smoke to the marinade. I prefer using smoked paprika because it adds a subtle, earthy smokiness without overpowering the dish.
If you're feeling adventurous, try adding 1 tsp of coffee grounds to the marinade—it deepens the flavor and adds a subtle bitterness that balances the sweetness.
Creamy Finish Option
For a richer finish, stir 2 tbsp coconut milk or 1 tbsp heavy cream into the reduced marinade during the final 2 minutes of oven braising. This creates a silky, velvety sauce that pairs perfectly with the crispy pork.
I often drizzle this over the sliced pork just before serving for an extra-luxurious touch. 🥥
Gluten-Free Adaptation
Replace the kosher soy sauce with 0.5 cup tamari or 0.5 cup coconut aminos to make this dish gluten-free. While tamari provides a closer flavor to traditional soy sauce, coconut aminos offer a slightly sweeter, more nuanced taste.
For extra umami depth, add 1 tsp fish sauce or 1 tsp mushroom powder to the marinade. This adjustment keeps the dish authentic while accommodating dietary restrictions.
Nutrition facts
Frequently asked questions about adobo pork tenderloin
Can I use regular pork loin instead of tenderloin?
The recipe is designed for tenderloin because of its consistent tenderness and lean profile. However, you can adapt it for pork loin by cutting it into 1-inch thick medallions and adjusting cooking time to 18-22 minutes in the oven. The marinade works beautifully on both cuts, but tenderloin gives you that perfect balance of crispy exterior and melt-in-your-mouth interior without needing to worry about uneven doneness.
How do I know when the pork is fully cooked?
Use an instant-read thermometer to check the internal temperature at the thickest part. The pork is done when it reaches 145°F—this is the USDA-recommended safe minimum internal temperature for pork. It will continue carrying over to 150°F as it rests, so don't overcook it. If you don't have a thermometer, cut into the thickest part—juices should run clear, not pink.
What's the best way to reheat leftovers?
Slice the pork into ½-inch thick pieces and reheat in a skillet over medium heat with a splash of water or reserved marinade for 3-4 minutes per side. For extra crispiness, broil for 1-2 minutes at the end. Avoid microwaving—it makes the pork rubbery. The reheated slices work perfectly in sandwiches, rice bowls, or fried rice.
Can I make this recipe in a slow cooker?
Yes! Sear the pork first, then place it in the slow cooker with the marinade and bay leaves. Cook on Low for 4-5 hours or High for 2-3 hours until tender. The texture will be more tender than crispy, but it's delicious served with a side of pickled vegetables or steamed greens. For extra flavor, add 1 tsp toasted sesame oil when serving.
Why is my pork dry even though I followed the recipe?
This usually happens when the pork is overcooked or not rested properly. Always let the pork rest for 10 minutes after cooking—this allows juices to redistribute. Also, avoid cutting into it immediately. If using a meat thermometer, remove the pork when it hits 145°F—it will continue cooking as it rests. For extra moisture, add 1 tbsp water or broth to the pan during oven cooking.