
Main Courses
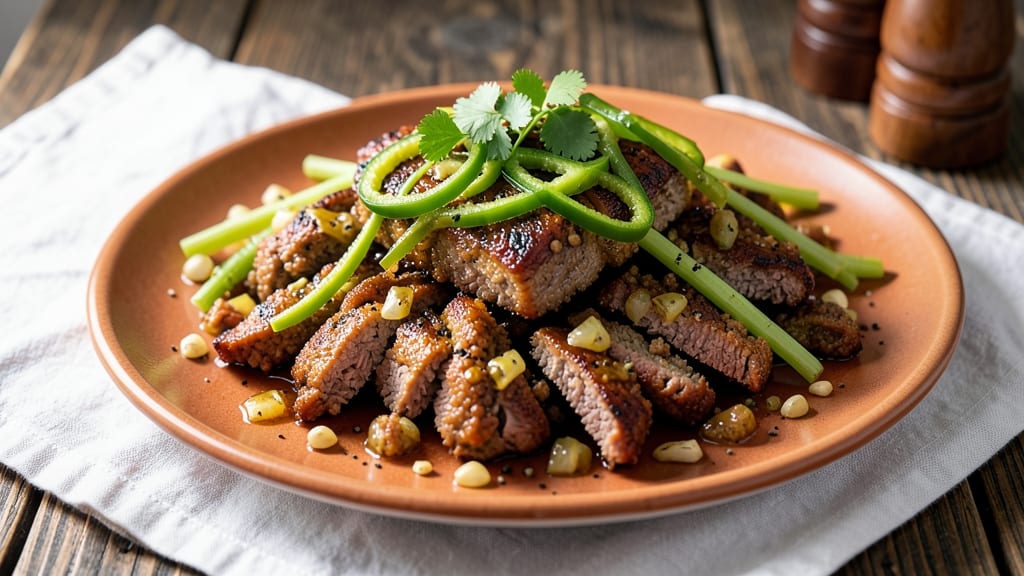
This minced pork sisig recipe brings the bold, smoky flavors of Filipino street food to your home table—where crispy celery crowns meet tender pork and a rich onion gravy. After years of perfecting the balance between charred edges and juicy centers, I’ve developed a method that delivers restaurant-quality results without the fuss. The key? High-heat sizzling and a touch of vinegar to cut through the richness, just like the versions I tasted in Manila’s bustling carinderias.
What sets this recipe apart is the crispy texture that defines sisig—achieved by pan-frying the pork until golden, then topping it with fried eggs and onions for that signature crunch.
I’ve adapted the classic technique for home cooks, using simple ingredients like calamansi (or lemon) and chili flakes to capture the tangy-savory profile that makes sisig irresistible.
The dish is hearty enough for a main course but quick enough for a weeknight dinner, proving that comfort food doesn’t require hours in the kitchen.
By the time you’re done, you’ll have a plate of sizzling, aromatic sisig with crispy edges that shatter at every bite and a gravy so rich it’ll have everyone asking for seconds.
The fried egg on top adds a creamy contrast, while the onions caramelize into sweet, smoky strands that tie everything together. This is the kind of dish that tastes like a celebration—no matter the occasion.
Serve it with steamed rice to soak up every last drop of that smoky gravy, or pair it with a cold beer for the full Filipino experience.
Whether you’re making it for a gathering or a solo craving, this recipe delivers the bold, satisfying flavors that make sisig a global favorite. Let’s get cooking!
Ingredients for minced pork sisig
Crispy edges, smoky gravy, and juicy pork—these ingredients bring Filipino street food to your kitchen.
| Ingredient | Amount | Notes |
|---|---|---|
| Minced Pork Shoulder 🥩 | 1 ½ lb | Freshly minced for best texture |
| Yellow Onions 🧅 | 2 whole | Thinly sliced for crispy crowns |
| Celery Stalk 🥬 | 1 whole | Thinly sliced, for crunch |
| Green Bell Pepper 🌶️ | 1 whole | Diced, for freshness |
| Garlic Cloves 🧄 | 6 cloves | Minced, for aromatic depth |
| Calamansi Juice 🍋 | ¼ cup | Or substitute lemon juice |
| Chili Flakes 🔥 | 1 tbsp | Adjust for heat preference |
| Soy Sauce 🥢 | 2 tbsp | Light or dark preferred |
| Olive Oil 🫒 | 2 tbsp | For high-heat frying |
| Large Eggs 🥚 | 2 whole | Fried on top |
| Salt 🧂 | 1 tsp | Kosher or sea salt |
| Black Pepper 🌶️ | ½ tsp | Freshly ground preferred |
| Steamed White Rice 🍚 | 3 cups | For serving |
The pork shoulder is key here—it stays juicy while developing that signature crispy texture. Look for well-marbled cuts at your local butcher or Costco for the best quality. If you can't find minced pork pre-packaged, grab ground pork and pulse it in a food processor for that authentic texture. The celery and bell pepper should be fresh—bright green, no wilting. For the onions, yellow or red work best—they caramelize beautifully. If you're feeling fancy, grab calamansi juice at an Asian market, but lemon juice works perfectly if that's all you've got.
No calamansi? Lime juice at double the amount gives a similar tang. Running short on chili flakes? Cayenne pepper at half the amount works, but taste first—it's spicier. The soy sauce is non-negotiable for that umami depth, but coconut aminos in a pinch won't ruin it. For the eggs, room temperature makes all the difference—they'll fry up fluffier. The rice? Day-old rice reheated prevents soggy results when serving.
This dish tastes even better the next day—make extra. Store leftovers in the fridge for 3-4 days, covered tightly. For crispier texture, reheat in a skillet over medium heat. The fried eggs add richness, so if you're making ahead, fry them fresh right before serving. Freeze portions without eggs for up to 2 months—just add the fried eggs when reheating.
Why You'll Love This Recipe
- One-Pan Magic: I swear by this recipe because it’s literally one pan, one spatula, and zero dishes. The pork cooks down crispy on the edges while the onions caramelize—no flipping, no fussing, just sizzle and satisfaction.
- Garlic Bomb Flavor: That moment when you press the minced pork into the pan and the garlic starts to bloom? Chef’s kiss. The crispy top, the tender pork, and the bright crunch of raw onion on top—it’s the kind of dish that makes you want to eat it straight from the skillet.
- Party in a Bowl: Between us, this is my go-to for game day, potlucks, or when my college-aged kids bring friends over. It’s hearty enough to feed a crowd but still feels special—plus, the raw onion topping lets everyone customize their bite.
- Budget Hero: Minced pork shoulder is cheaper than cuts like tenderloin, and the veggies stretch it into a whole meal. I’ve made this for under $10 for four people, and honestly? No one ever complains about leftovers—if anything, they beg for seconds.
Step-by-step instructions for minced pork sisig
Here's how to make this crispy, savory dish with perfect textures and bold flavors.
Prepare the Celery Crowns
Start by slicing the 1 whole celery stalk into thin, even strips about ¼-inch wide. This is the star of your sisig—those crispy celery crowns should be tender-crisp, not mushy. I like to slice them on the bias for extra surface area that'll get nicely browned.
Set the celery aside and move on to the 2 whole yellow onions. Thinly slice them into half-moons, keeping them as even as possible. These will form the base of your smoky gravy, so you'll want them to caramelize beautifully. The more even your slices, the more consistent your cooking will be.
Cook the Aromatics and Pork
Heat 2 tablespoons olive oil in a large skillet over medium-high heat until shimmering. Add the 6 cloves minced garlic and stir for 30 seconds until fragrant—you should smell that wonderful garlic aroma. Immediately add the 1 whole diced green bell pepper and cook for 2 minutes until slightly softened.
Push the vegetables to one side of the pan and add the 1.5 lb minced pork shoulder in the empty space. Let it sear undisturbed for 3-4 minutes until the pork loses its raw color and starts to brown. This initial searing builds deep flavor. Stir occasionally, breaking up any large clumps, until the pork is fully cooked through—about 5-6 minutes total. The pork should be golden brown with no pink remaining.
Build the Flavor Base
Reduce the heat to medium and add the thinly sliced yellow onions to the pan. Cook for 5-6 minutes, stirring occasionally, until they begin to soften and develop a golden hue. This is where the magic happens—the onions will caramelize and create that rich, smoky gravy that's so characteristic of sisig.
Now it's time to add the seasonings. Stir in the 1 tablespoon chili flakes, 2 tablespoons soy sauce, 1 teaspoon salt, and ½ teaspoon black pepper. Let everything cook together for 2-3 minutes until the flavors meld and the onions are tender but still holding their shape. The chili flakes will infuse the mixture with just the right amount of heat, while the soy sauce adds that signature umami depth.
Finish with Juice and Crispy Toppings
Pour in the ¼ cup calamansi juice (or lemon juice if substituting) and stir well. The acidity will brighten all the flavors and help balance the richness of the pork. Let the mixture simmer for 1-2 minutes until the juice is mostly absorbed and the pork is nicely coated in the flavorful gravy.
Now for the crispy finish. Add the thinly sliced celery crowns to the pan and cook for 3-4 minutes over medium heat, stirring occasionally. You want them to soften slightly but still maintain their crisp texture. The celery should be tender-crisp with just a hint of bite. Remove the pan from heat and set aside.
Fry the Eggs and Assemble
In a separate non-stick skillet, heat 1 tablespoon olive oil over medium heat. Crack the 2 whole large eggs into the pan and fry them sunny-side up until the whites are set but the yolks remain runny—about 2-3 minutes. The runny yolks will create a silky contrast to the crispy sisig.
To serve, mound the 3 cups steamed white rice on each plate. Spoon the minced pork mixture over the rice, then place one fried egg on top of each serving. The hot egg will melt slightly into the crispy pork, creating the perfect balance of textures. Garnish with any remaining celery crowns and serve immediately while everything is hot and crispy.
Pro Tips For Making Minced Pork Sisig
- CRISP THE PORK IN BATCHES: I learned this the hard way—dumping all that minced pork in the pan at once just makes it steam instead of crisp. Split it into two rounds: cook half until golden, then push to the side and add the second batch. The first batch will finish browning while the second gets its start, giving you that perfect mix of crispy edges and juicy centers.
- CHOP ONIONS INTO THIN SLICES: Thinly sliced yellow onions caramelize faster and add texture without overwhelming the dish. Skip the dice—aim for paper-thin half-moons. If you’re impatient like me, microwave them for 30 seconds first to soften before adding to the pan. They’ll release sweetness without burning.
- DON’T OVERMIX THE PORK: Stirring constantly turns sisig into mush. Let the pork sear undisturbed for 2-3 minutes in patches, then gently fold it once or twice. The goal is even browning, not a paste. Overmixing also squeezes out fat, leaving you with dry, greasy pork instead of crispy, flavorful bites.
- USE COLD PORK FOR CRISPINESS: Take the minced pork straight from the fridge—cold fat renders better and creates more surface area for browning. If you’re in a hurry, wet your hands and shape it loosely into a patty before cooking. It’ll hold together better and get that coveted crust faster than pre-warmed meat.
Common mistakes when making this recipe
Overcooking the Pork
One of the most common mistakes is letting the pork get too dry or rubbery. I’ve seen home cooks walk away from the stove too soon, then come back to find the pork tough instead of tender.
The secret is to cook it just until it’s fully done—no pink should remain—but don’t overcrowd the pan. If your pork is sticking or looks like it’s drying out too fast, reduce the heat to medium-low and let it cook gently. 🔥
Skipping the Celery Crowns
Some recipes treat celery as an afterthought, but those crispy crowns are what make sisig special. If you skip them or undercook them, you’re missing the dish’s signature texture. Slice them thinly and cook them just until tender-crisp—about 3-4 minutes in the pan with the pork.
Pro tip: Add them in the last few minutes so they stay crispy, not soggy.
Using the Wrong Heat Level
High heat is your friend for crispy edges, but too much too soon can burn the pork before it cooks through. I’ve seen beginners crank the heat all the way up, then end up with charred pork and raw centers.
Start with medium-high heat and adjust as needed. If the pork is browning too fast, lower the heat slightly and let it cook more gradually. The goal is golden, not blackened.
Ignoring the Onion Gravy
The rich, smoky gravy from caramelized onions is what ties the dish together. If you rush this step or don’t cook the onions long enough, your sisig will lack depth. Let those onions soften and develop color—about 5-6 minutes over medium heat.
Stir occasionally so they don’t stick, and resist the urge to speed it up. Patience here makes all the difference. 💫
Substituting Ingredients Poorly
Calamansi juice is key for that bright, tangy kick, but I’ve seen people substitute with vinegar or even skip it entirely. If you can’t find calamansi, use lemon juice at double the amount—it’s the closest substitute.
Similarly, don’t swap soy sauce for something like Worcestershire unless you adjust the seasoning. The balance of flavors is delicate, so stick to the trusted ingredients or make small, thoughtful swaps.
Not Resting the Pork
After cooking, let the pork rest for 2-3 minutes before adding the celery and eggs. Skipping this step can make the final dish watery or unevenly textured. The rest gives the juices time to redistribute, ensuring every bite is moist and flavorful.
Trust me, those extra minutes make a world of difference in the final result. ⏰
Nutrition facts
Frequently asked questions
What makes this sisig recipe different from traditional versions?
This recipe focuses on achieving that signature crispy celery crown texture while maintaining tender pork and a rich onion gravy. The key difference is the high-heat sizzling technique for the pork and the precise timing for the celery—cooked just until tender-crisp in the last 3-4 minutes. Many traditional recipes skip the celery or undercook it, but those crispy strands are what define authentic sisig.
Can I make sisig without a skillet or stovetop?
Yes! For an air-fryer version, spread the cooked pork mixture on a wire rack inside the air fryer at 375°F for 3-4 minutes to crisp the edges. For oven-baked sisig, spread the mixture on a baking sheet and broil for 2-3 minutes until browned. Just watch it closely—high heat is still essential for that crispy texture. The fried eggs can be made separately in a microwave-safe bowl (cover and cook for 45 seconds at 50% power).
How do I adjust the heat level in this recipe?
The chili flakes provide mild heat, but you can easily adjust it. For milder heat, reduce to ½ teaspoon or swap for ¼ teaspoon cayenne pepper. For spicier sisig, add ½ teaspoon extra chili flakes or a pinch of crushed red pepper flakes. Always taste before serving—Filipino cuisine balances heat with tangy elements like calamansi juice, so the acidity helps balance any spice.
What’s the best way to serve sisig?
Traditionally, sisig is served with steamed white rice to soak up the smoky gravy. For extra authenticity, add toasted garlic rice or garlic fried rice. Pair with a cold Filipino lager beer (like San Miguel) or a crisp white wine. The fried egg on top adds richness, so serve immediately while it's warm. For a complete meal, include pickled vegetables or a simple green salad to balance the richness.
Can I make sisig ahead of time?
The pork mixture keeps well in the fridge for 3-4 days in an airtight container. For the best texture, reheat in a skillet over medium heat until warmed through. The celery will soften slightly, but the flavors deepen. Never reheat the fried eggs—make them fresh right before serving. For longer storage, freeze the pork mixture (without eggs) for up to 2 months. Thaw overnight in the fridge before reheating.