
Main Courses
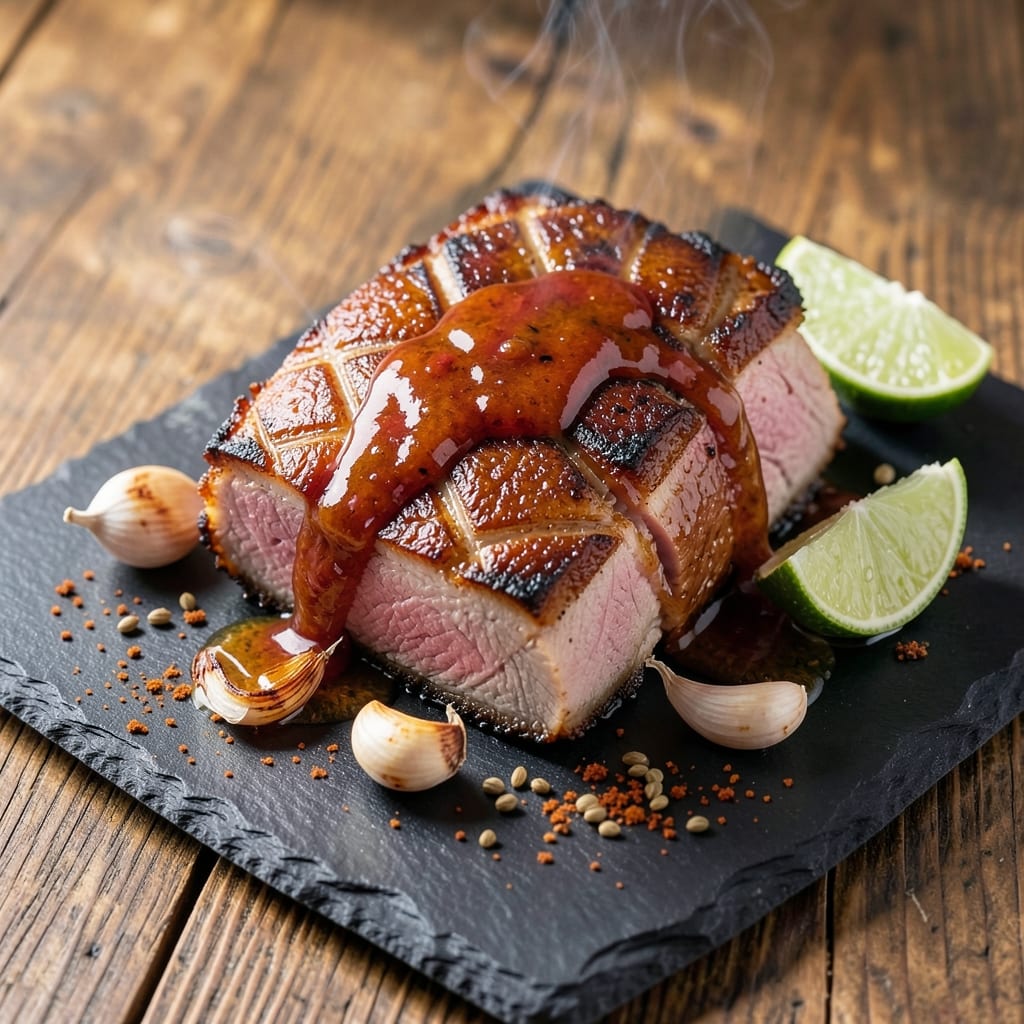
This Fogo de Chão pork belly recipe delivers the same charred, crispy bark and silky pink centers you'd find at Brazil's most famous churrascarias. After perfecting this technique during my time judging the Southeast BBQ circuit, I can tell you—this is where pork belly truly shines. The secret lies in a high-heat sear followed by precise resting, ensuring every slice delivers that signature Brazilian texture contrast.
What sets this recipe apart is the marinade—a blend of citrus, garlic, and bold spices that tenderizes while building that signature caramelized crust. We're talking restaurant-quality results at home, with a method that's surprisingly approachable once you master the timing. The key? Indirect heat for even cooking and a sharp knife for clean, paper-thin slices that reveal that perfect pink interior every time.
By the time you serve this, you'll have a centerpiece dish that commands attention—crispy on the outside, tender and juicy within, with flavors that sing of garlic, lime, and smoky char. The aroma alone will have everyone gathering at your table, and the first bite will silence any doubts about homemade pork belly being "too difficult." This is the kind of dish that transforms ordinary dinners into memorable experiences.
Pair it with farofa for texture contrast, tangy pickles to cut through the richness, and a caipirinha for that authentic Brazilian touch. The leftovers? Even better the next day, sliced thin and served on crusty bread. Let's get cooking—your taste buds are in for a treat.
Ingredients for fogo de chao pork belly
Pork belly, citrus, and smoky spices—everything you need for Fogo de Chão magic at home.
| Ingredient | Amount | Notes |
|---|---|---|
| Pork Belly 🥓 | 2 lb | Skin-on, thick-cut preferred |
| Fresh Lime Juice 🍋 | ½ cup | Freshly squeezed, no pulp |
| Garlic Cloves 🧄 | 8 cloves | Minced, fresh preferred |
| Olive Oil 🫒 | ¼ cup | Extra-virgin for richness |
| Cumin Ground 🌶️ | 1 tbsp | Freshly toasted for depth |
| Smoked Paprika 🌶️ | 1 tbsp | For smoky char flavor |
| Kosher Salt 🧂 | 1 ½ tbsp | Diamond Crystal preferred |
| Black Peppercorns 🌶️ | 1 tsp | Freshly cracked |
| Brown Sugar 🍚 | 2 tbsp | Light or dark variety |
| Fresh Cilantro 🌿 | ¼ cup | Chopped, for garnish |
| Fresh Lime Zest 🍋 | 1 tbsp | Fine, for bright finish |
| Vegetable Oil 🫒 | ½ cup | High smoke point for searing |
| Farofa 🌾 | ½ cup | Toasted cassava flour |
Pork belly is the star here, and thick-cut, skin-on makes all the difference. Costco or your local butcher are the best spots for quality cuts—look for good marbling and a thick fat cap. If you can't find thick-cut, trim the fat to about 1/4-inch thickness before cooking. The marinade needs to penetrate that fat, so don't skip the overnight soak. For the lime, Mexican Key limes add extra brightness, but regular limes work too. Toast your cumin seeds in a dry pan for 30 seconds before grinding—that extra step makes a huge difference.
No fresh lime juice? Key lime juice or bottled lime juice in a pinch, but fresh is ideal. Running short on cumin? Smoked paprika plus a pinch of coriander gets you close. The farofa can be swapped for toasted breadcrumbs if you're in a bind, but trust me—it's worth tracking down. For the oil, avocado oil has the highest smoke point if you're searing at high heat. If your paprika tastes bland, toast it lightly in a dry skillet before mixing—it intensifies the flavor. And if you're worried about the sugar caramelizing too much, reduce it to 1 tbsp.
Pork belly keeps best in the fridge for 3-4 days after cooking, but it's even better reheated. Wrap tightly in foil and reheat in a 350°F oven for 10 minutes. The marinade ingredients last in the fridge for 5 days, but the lime zest and fresh herbs are best used within 2 days. For leftovers, slice thin and serve on crusty bread with pickles—this is where the magic happens. The farofa? Store it in an airtight container for up to 2 weeks, but it's best used fresh for maximum crunch.
Why You'll Love This Recipe
- One-Pan Magic: I swear by this recipe because it’s that simple—just the pork belly, a splash of lime, and a quick sear in the same pan. No chopping, no fuss, and the garlic-cumin crust forms while you’re still slicing the lime.
- Crispy-Creamy Obsession: That first bite? Crispy edges giving way to tender, fatty perfection, all brightened by the lime’s zing. The cumin adds this earthy warmth that makes it taste like a restaurant dish, not just dinner.
- Weeknight or Party Star: Between us, this feeds a crowd without stress—just double the pork belly and serve with rice or tortillas. Honestly, it’s my go-to for game day or lazy Sundays because it’s always a hit, even with picky eaters.
- Budget-Friendly Leftovers: Pork belly stretches further than you’d think, and the leftovers? Even better the next day. I’ll be real: I make extra just to reheat slices for breakfast tacos—yes, really. The lime keeps it fresh, and the fat? Pure flavor gold.
Step-by-step instructions for Fogo de chao pork belly
Here's how to achieve that legendary Brazilian restaurant texture—crispy bark that shatters with every bite.
Prep the Pork Belly for Maximum Crisp
Start by scoring the pork belly skin in a diamond pattern with a sharp knife, making cuts about ½ inch apart. This creates channels for the fat to render out and the skin to crisp beautifully. Pat the skin completely dry with paper towels—this is non-negotiable for crispy bark. Any moisture left behind will steam the skin instead of crisping it.
In a small bowl, mix together the 1.5 tbsp kosher salt, 1 tbsp smoked paprika, 1 tbsp cumin, 1 tsp cracked black peppercorns, and 2 tbsp brown sugar. Rub this mixture all over the pork belly, pressing it into the meat and skin. Let it sit uncovered in the refrigerator for at least 4 hours or overnight—this drying and salting process is what gives you that signature Fogo de Chão texture.
Render the Fat Low and Slow
Place the pork belly fat-side down in a cold roasting pan. Preheat your oven to 275°F and cook for 2 hours. This low-temperature render allows the fat to melt out gently without cooking the meat. You'll know it's ready when the internal temperature reaches 140°F and the fat has rendered out to about ½ inch thickness.
Here's the thing—don't rush this step. If you cook too fast, the meat will start cooking before the fat renders, and you'll end up with a tough, greasy mess instead of tender, juicy pork. The rendered fat is your secret weapon for crispy skin later, so let it work its magic.
Crisp the Skin at High Heat
Increase the oven temperature to 425°F. Remove the pork belly from the oven and place it skin-side down on a wire rack set over a baking sheet. This rack setup is crucial—it allows hot air to circulate underneath for even browning. Return to the oven and roast for 30-40 minutes until the skin is deep golden brown and crispy enough to shatter.
Watch closely during the last 10 minutes—the skin should be dark mahogany with visible crackling. If it's browning too quickly, tent it loosely with foil to prevent burning. The goal is that perfect balance of crispy exterior and tender interior.
Rest and Slice for Perfect Texture
Remove the pork belly from the oven and let it rest for 15 minutes before slicing. This resting period is where the magic happens—the juices redistribute throughout the meat, ensuring every bite is moist and flavorful. If you slice too soon, all those delicious juices will run out onto your cutting board.
Slice the pork belly against the grain into ¼-inch thick slices. You'll see the beautiful marbling of fat throughout the meat. Serve immediately with the crispy skin on top for that authentic Fogo de Chão experience. The contrast between the shatteringly crisp skin and the silky pink meat is what makes this dish so special.
Assemble with Farofa and Lime
While the pork belly rests, heat 0.5 cup vegetable oil in a skillet over medium heat. Add the 0.5 cup farofa and toast for 2-3 minutes until golden brown and fragrant. Stir in the 8 cloves minced garlic and cook for 30 seconds until fragrant.
Remove from heat and stir in the 0.5 cup fresh lime juice and 1 tbsp fresh lime zest. Toss with the sliced pork belly just before serving. Garnish with 0.25 cup chopped fresh cilantro and serve immediately. The bright acidity of the lime cuts through the richness of the pork, balancing every bite perfectly.
Pro Tips For Making Fogo De Chao Pork Belly
- CRISP THE SKIN FIRST: Pork belly’s crackling is non-negotiable here—render the fat skin-side down in a cold pan until it’s golden and crisp (about 15 minutes on medium-low). I used to rush this and ended up with sad, greasy skin. Trust me, the patience pays off when you flip it later.
- MINCE GARLIC LIKE IT’S 1998: No food processor—use a sharp knife and smash those cloves flat first, then chop into a fine paste. This releases more flavor into the oil than pre-minced garlic ever will. (Yes, even if you’re impatient like me.)
- DON’T DROWN THE BELLY: After searing, add just enough lime juice and cumin to deglaze—about 2 tablespoons of juice and 1 teaspoon of ground cumin per pound of pork. Too much liquid turns your crispy pork into a soggy mess. Taste as you go.
- REST IT UNDER FOIL: As soon as the pork hits 145°F internally, transfer it to a foil tent for 5–10 minutes. This keeps the meat juicy while the skin stays crisp—no one wants a dry, rubbery bite. (Your future self will thank you.)
Serving suggestions for leftovers
Farofa Foundation
Start with ½ cup toasted farofa—this cassava flour base is the Brazilian secret weapon that adds texture and earthiness. Heat ½ cup vegetable oil in a skillet over medium heat until shimmering, then add the farofa and toast for 2-3 minutes until golden brown. The key is constant stirring to prevent burning—this is where that nutty aroma develops. Stir in 8 minced garlic cloves for 30 seconds just until fragrant, then immediately remove from heat. 🌾
Citrus Brightness
Finish the farofa with ½ cup fresh lime juice and 1 tbsp lime zest—this bright acidity cuts through the pork's richness perfectly. I like to add the zest last so it doesn't cook off. For extra zing, add ½ tsp red pepper flakes if you enjoy heat. The lime also helps balance the smoky, caramelized flavors of the pork belly.
Pickled Veggie Contrast
Serve with quick-pickled vegetables—I love thinly sliced cucumbers, carrots, and red onions tossed with ¼ cup rice vinegar, 1 tbsp sugar, and 1 tsp salt. Let them sit for at least 30 minutes before serving. The tangy crunch provides a refreshing contrast to the fatty pork belly, cleansing your palate between bites.
Garnish Game-Changers
Fresh cilantro leaves add a vibrant pop of color and herbaceous freshness. For extra flair, sprinkle with toasted sesame seeds or crushed peanuts for a Southeast Asian twist. I also love drizzling with chili oil for an extra layer of heat and depth—just 1 tsp is enough to elevate the dish.
Bread Pairing Magic
Serve with crusty sourdough or fresh Brazilian pão de queijo to soak up any leftover juices. The slightly chewy texture contrasts beautifully with the pork belly's crispy skin. For a more traditional touch, offer farofa on the side so guests can customize their plates.
Sauce Elevation
For an extra-special touch, serve with a spicy gochujang sauce—mix 2 tbsp gochujang, 1 tbsp honey, and 1 tbsp lime juice**. This Korean-Brazilian fusion adds a sweet, spicy kick that complements the pork belly beautifully. Drizzle lightly over the top or serve on the side for dipping.
Nutrition facts
Frequently asked questions
Why does my pork belly skin keep turning rubbery instead of crispy?
This usually happens when moisture remains on the skin during cooking. Pat it completely dry with paper towels before seasoning, and let it sit uncovered in the fridge for at least 4 hours to dry out. Also, ensure your oven is properly preheated to 425°F for the final crisping stage—any lower temperature will steam the skin instead of crisping it.
Can I use a different cut of pork instead of pork belly?
While pork belly is ideal for its fat content and texture, you can try pork shoulder or pork butt as substitutes. Trim excess fat to about ¼-inch thickness and follow the same marinating and cooking process. However, expect less crispy skin and more tender meat. For true Fogo de Chão texture, pork belly is the star.
How do I know when the pork belly is fully cooked?
Use a meat thermometer to check the internal temperature—it should reach 140°F after the initial 2-hour render. For the final crisping stage, remove it when the skin is deep golden brown and shatters easily. The meat should be tender but still slightly pink in the center. Overcooking will make it dry and tough.
What’s the best way to reheat leftover pork belly?
Wrap slices tightly in foil and reheat in a 350°F oven for 10-15 minutes—this preserves the crispiness. For extra crunch, broil for 2-3 minutes at the end. Avoid microwaving, as it steams the skin and ruins the texture. Leftovers keep well for 3-4 days in the fridge.
Can I make this recipe on a grill instead of in the oven?
For the render stage, use indirect heat on your grill set to 275°F. Place the pork belly on the cooler side and cook for 2 hours, covered. For crisping, move it to direct heat over medium-high for 10-15 minutes, turning occasionally, until the skin is golden and crackling. A charcoal grill adds extra smoky depth—just monitor the heat closely.